I haven't posted in a few weeks. Sending a big 'sorry' out to everyone who follows my posts.
But I've been busy-ish with crafty things since my last post, so I bet you'll forgive me.
I finished sewing the neck facing to my linen under-tunic and changed it to a square neckline to wear with my new Elizabethan type dress. I finished this at Crown Tournament minutes before my escort arrived at my campsite to take me to the opening procession. I still needed to finish he bottom hem, but that didn't need to be done right away since it is hidden under to outer layer. I also need to tack the extra sleeve length up into the inside of the sleeves before I can call it done.
I bought a lucet at Crown Tournament to make laces for the Elizabethan dress. This will replace the polyester ribbon I am currently using
I hemmed a square of what used to be a poly-cotton pillowcase to use as headkerchief.
I started cutting out a long grey/green linen tablecloth into a new under-tunic. This one is using the same generator that I used for my green cotton under-tunic, and is meant to replace said garment. My original cotton one has a irremovable stain at shin height, and I'd like to start moving away from using cotton.
And I've been drop spindling lots of wool. I need both mittens and socks before it gets cold again (not that it has warmed up yet.)
You will get pictures of these things soon. I promise to make this happen early next week, as I'm heading off tomorrow to June Faire for the weekend.
Thursday, June 2, 2011
Wednesday, May 18, 2011
New Dress!
I had a spur of the moment wave of inspiration last night and made up a new dress for myself.
This one is an Elizabethan type, based on the corset pattern I drafted up in the last post. I settled on the gathered kirtle, purely out of need for fabric economy. I squeezed it out of about three yards of upholstery fabric I picked up at Wally World last year. I'll post more details on construction at some point when it is all finished up. You'll see in the pictures that I still need to hem this, and finish sewing the shoulder straps, and finish the side skirt opening.
I'm also going to modify my linen tunic to wear with this by cutting the neckline to a square.
A slideshow of pics of my new dress!
Lets forget about my confused tunic
Just for a little while we're forgetting about the tunic that was a simple men's, then wanted to be Irish, and now will be neither.
I've been working on something much more exciting. I'm trying an Elizabethan corset.
Why? Well because I really like the support of a bra, but I'm tired of wearing modern undergarments with my somewhat historical clothing. I realize this isn't the right undergarment for any of the clothing items I currently have, but maybe it will be eventually.
I have to say I have a huge crush on Drea Leed and her Elizabethan Costuming website (http://www.elizabethancostume.net/). Her website has a great generator for a corset pattern by your measurements, you put in your measurements here and get illustrated instructions that walk you through drafting out your own customized pattern.
So I am working on a modified mockup of the boned tabbed version. It will be faced and lined with fabric from a striped cotton bedsheet, though I do intend to wear this for awhile before I move on to a better constructed one it is still just a mockup.
This mockup will also serve another purpose. By making up the corset and noting any modifications I need to make, I will also be able to draft out a bodice pattern from the same lines that the corset pattern gives me.
I think I'm going to make the Gored Kirtle, but I might go with the Gathered Kirtle
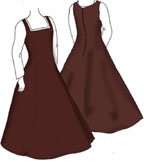 |
| Gored Kirtle from www.elizabethancostume.net |
 |
| Boned Tabbed Corset from www.elizabethancostume.net |
Wednesday, May 4, 2011
A Sideless Surcoat
And now we come to my last completed garment, my sideless surcoat.
This is probably the most appropriate outfit for me to be wearing with the hair style I have in my picture. I made up this in a few hours one day so that I'd have something 'nice' to wear. It only took 1.5 yards too! Or rather I was limited to the 1.5 yards of this fabric that I had available. I think I'm going to sew up a gothic fitted kirtle to wear as my standard layer under this. I have some woven silk fabric in mind for it in a deep red with black warp threads. It'll look dangerously regal, but the SCA doesn't have sumptuary laws for colors of garments.
If you want a better look at the fabric I used for this, look at the background I put up here! Thats the fabric I used. It's at least partially cotton, and likely 100% cotton, but it has a perfect look to it. Because I constructed this in a hurry, I used the sewing machine, but that allowed me to be super quick about it. I do need to go back and bind the inside seams, I left them unfinished to allow a little more ease over my hips and out of lack of time. This was also my first adventure in making bias tape, and even though it was a lot of work, I love the result. Bias tape is a dream to work with, it went around the curves of the arm holes like a dream. At some point I do need to take off the bias tape and re-apply it with hand stitches. I might adjust the shape to dip in narrower at the waist as well.
And now I'm at the end of my constructed garments. I think I'll give an update on my linen under-tunic next.
Monday, May 2, 2011
The overdue viking dress
What can I say? I'm horrible at keeping up with regular postings. So, without further ado here in my viking apron dress:

The style I chose for my dress is the tube dress that flares from the hips. I'd really love to make the other more accurate style of two overlapping free panels or of one long overlapping panel next time. This time I decided to stay with a well loved and prevalent method so that I could be ensured great results without making up a muslin. Here is a diagram of the cutting method I used:
I cut this out of a cotton blanket that I picked up at a resale shop on the cheap. Cotton? You ask. Yes, but it looks like herringbone wool from a two foot distance. It's not until you get your eyes right in there all close and personal and maybe give it a good feel that you realize that it's not wool. I think this is going to make it a life saver during the three weeks in August that everyone tells me get extremely hot out here.
Two things I did just a little differently were that I decided to waste just a little fabric and eliminate the halved pieces. I just moved over my cutting diagram and made them whole. This is because I had more fabric than needed for this project, but not enough left over to make another project out of, I was going to have fabric waste either way. I also eliminated the bottom band to make this calf length after hemming. I might have lengthened the entire pattern by just a few inches instead, but I honestly can't remember. Instead of hemming the top edge I cut off the top band on the blanket and used that to finish my top edge. This keeps the top from stretching out and I think it gives it a very finished look.
The straps are pieces of the edge binding of the blanket. In the front are two short loops and coming from the back are two long loops. These are meant to be held together by big ornate shield brooches. These are something I am going to have to wait a bit for, but I should be able to find some through a SCA merchant at some event this summer. Something I did already own was a festoon of beads:

I made this at a workshop during an event from 18 gauge wire strung with glass and metal beads. The danglies might not be accurate.
For anyone looking for more inspiration, here is a handout that I found on the internet that gives more information and cutting diagrams and instructions for another version of the apron dress and for a better under-tunic.
Next up will be my sideless surcoat.

The style I chose for my dress is the tube dress that flares from the hips. I'd really love to make the other more accurate style of two overlapping free panels or of one long overlapping panel next time. This time I decided to stay with a well loved and prevalent method so that I could be ensured great results without making up a muslin. Here is a diagram of the cutting method I used:
 |
| This is a design by eqos on deviantart.com, http://eqos.deviantart.com |
Two things I did just a little differently were that I decided to waste just a little fabric and eliminate the halved pieces. I just moved over my cutting diagram and made them whole. This is because I had more fabric than needed for this project, but not enough left over to make another project out of, I was going to have fabric waste either way. I also eliminated the bottom band to make this calf length after hemming. I might have lengthened the entire pattern by just a few inches instead, but I honestly can't remember. Instead of hemming the top edge I cut off the top band on the blanket and used that to finish my top edge. This keeps the top from stretching out and I think it gives it a very finished look.
The straps are pieces of the edge binding of the blanket. In the front are two short loops and coming from the back are two long loops. These are meant to be held together by big ornate shield brooches. These are something I am going to have to wait a bit for, but I should be able to find some through a SCA merchant at some event this summer. Something I did already own was a festoon of beads:

I made this at a workshop during an event from 18 gauge wire strung with glass and metal beads. The danglies might not be accurate.
For anyone looking for more inspiration, here is a handout that I found on the internet that gives more information and cutting diagrams and instructions for another version of the apron dress and for a better under-tunic.
Next up will be my sideless surcoat.
Tuesday, April 26, 2011
Blue wool tunic
Now, we're on to my blue wool tunic. This is on the very top of my repair pile, and has been for some time. One of the side seams has frayed and is becoming an ever larger hole. I just never seem inspired to do mending when there are shawls to knit, things to embroider, and bands to be tablet woven.


When I was collecting my materials for my under-tunic I was also checking around at resale shops for wool fabric, and I lucked out when I found some navy blue wool fabric. I pieced that together into this knee length version of my under-tunic with upholstery weight thread.
That got my through my first several events, and then when I wanted to embellish it a little more I bought several hanks of silk thread very cheaply on a now-defunct eBay store and embroidered a design onto my leftover cotton to tack onto the neck of my over-tunic. I wish I could find the design that inspired my embroidery, but I haven't been able to track it down. I do know that it was something that I originally traced off of my computer screen
Next up: A viking apron dress
Monday, April 25, 2011
Promised Pictures
Well, I borrowed a camera (a really really nice one with all kinds of shiny buttons and options menus!) and got some pictures of my outfits. The trouble is that I insisted on taking the pictures all by myself. This involved propping up the camera on a couple chair cushions and a binder on top of the table and using the timer. I was impatient with them too and only really took one take of each outfit.
I guess my main complaint is that the pictures are unflattering. I've gotten used to snapping lots of takes and coming out with some gems. But, without further delay, here is the start of my current garb pieces:
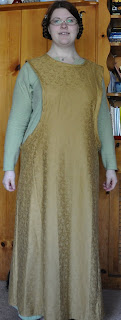
This is my basic layer. I made this my first freshman year at Michigan Technological University soon after I was introduced to SCA through the local branch, the Shire of Mistig Waetru. Since I was a starving college freshman I also had approximate budget of $10 including materials for an over-tunic layer. I went to the local wally world and bought 4 yards of mustard/golden yellow $1/yard cotton fabric, and a spool of thread. When I showed my shire my fabric the general consensus was that the color I had chosen made my coloring look absolutely sickly, so I threw my fabric into one of the dorm washers in the basement with a pack of greenish dye I bought for $1 on eBay and hoped for the best. The next day my fabric came out a beautiful sage green, albeit a little uneven (to this day if you look at my resulting tunic in the right sunlight you can see that one sleeve is a different shade than the body.)
For construction I put my measurements into this Elizabethan smock generator, used the authentic pieced layout, and sewed it all together by hand using a running stitch with two back stitches every couple inches. The generator calls it an Elizabethan smock, but it is based on the timeless t-tunic, especially when I used a key-hole neck (circle with a 4-inch vertical slit in the front.)
Next up: My blue wool short tunic
(expect this posting tomorrow)
I guess my main complaint is that the pictures are unflattering. I've gotten used to snapping lots of takes and coming out with some gems. But, without further delay, here is the start of my current garb pieces:
 |
| Please note that the hem isn't actually this uneven, or maybe it is, I guess I've changed bra cup sizes twice since I made this. |
For construction I put my measurements into this Elizabethan smock generator, used the authentic pieced layout, and sewed it all together by hand using a running stitch with two back stitches every couple inches. The generator calls it an Elizabethan smock, but it is based on the timeless t-tunic, especially when I used a key-hole neck (circle with a 4-inch vertical slit in the front.)
Next up: My blue wool short tunic
(expect this posting tomorrow)
Subscribe to:
Posts (Atom)